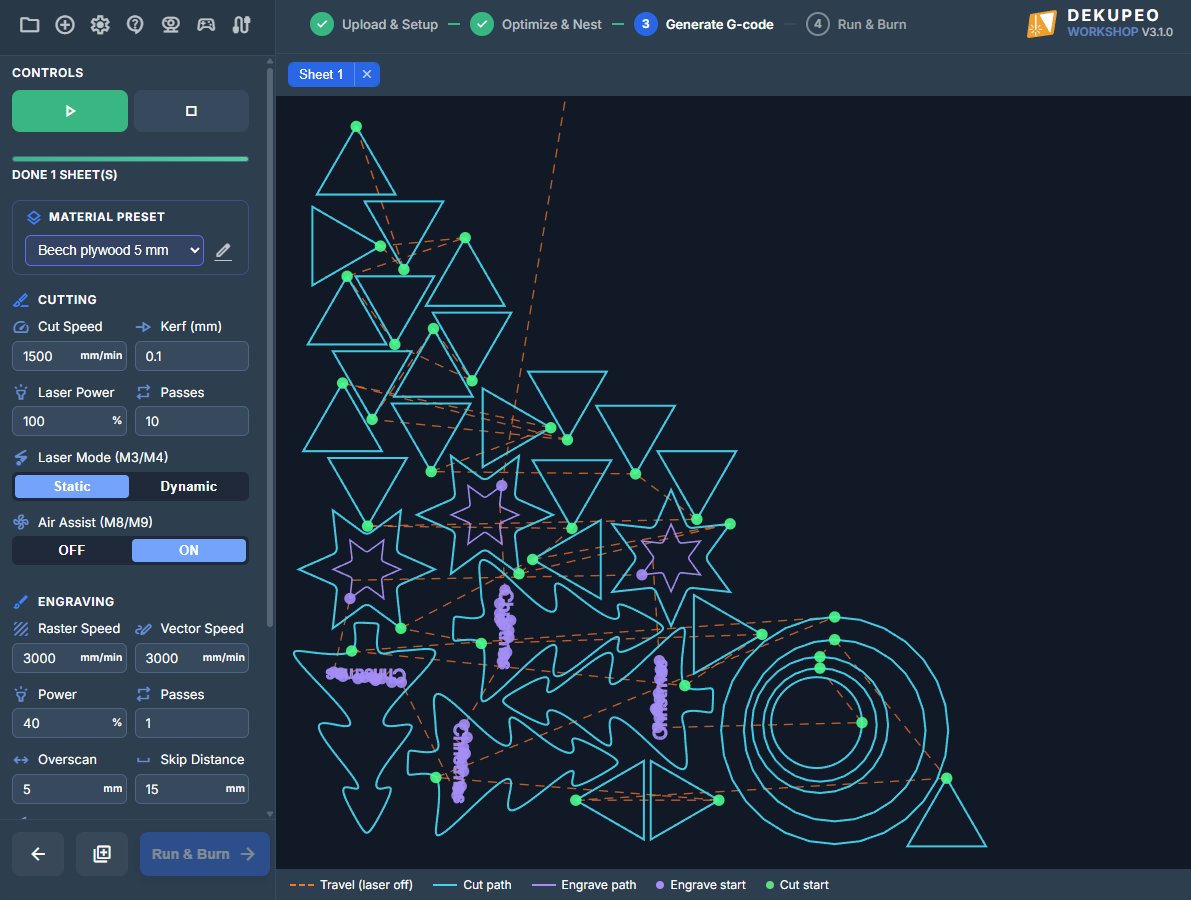
3. Generate
Once you are satisfied with the nesting layout, press Generate G-code button to proceed to the next step. Here you define the technical parameters of the cutting and engraving process. G-code can be generated for the entire nested layout or via the Create Menu (add_circle) only for individual parts cutting or engraving and for speed and power tests.
- Select a material preset or manually enter the cutting and engraving parameters manually.
- Click the Play button to start the G-code generation.
- You can download generated G-code or Execute it on your machine directly from Dekupeo.
Material Presets
To avoid entering the same values repeatedly, you can select a Material Preset. This will automatically fill in the speed, power, and passes for both cutting and engraving. You can manage these presets in the Settings page.
Laser Settings (Cutting)
These settings apply to the outer and inner contours of your parts (the cutting lines).
- Cut Speed – How fast the laser head moves while cutting (mm/min). Slow down for thicker materials.
- Kerf – Compensates for the thickness of the laser beam. Setting this to 0.1 mm will offset the path by 0.1 mm to ensure the final part has the exact dimensions intended.
- Laser Power – The intensity of the laser during cutting (1-100%).
- Passes – Number of times the laser will follow the same path. Multiple passes are often better for thick materials than a single slow pass.
- Laser Mode (M3/M4):
- M3 (Constant) – The laser stays at the set power regardless of speed.
- M4 (Dynamic) – Power scales automatically with speed (recommended for most GRBL controllers to prevent burnt corners).
- Tabs – Use tabs (bridges) to hold the parts in place during and after cutting. Tabs can be defined automatically by spacing or manually. You can set desired power for going over tabs and apply it only on last few passses to keep tabs thin for easy removal.
- Air Assist (M8/M9) – Automatically toggles your air pump or compressor if supported by your machine.
Engrave Settings
These settings apply to any paths found on the ENGRAVE layer of your DXF/SVG files and for attached raster, vector or text engraving. You do not need to create any separate sheets or layers for engraving in the Dekupeo app. Note that engraving always runs before cutting to ensure the part remains stable in the material sheet while being engraved.
- Speed & Power – Typically higher speed and lower power than cutting. You can set different speeds for raster and vector engraving.
- Passes – Usually kept at 1 for engraving.
- Overscan – Added length to raster engraving lines for acceleration outside the engraved area, which can improve edge quality..
- Skip Distance – Laser will travel over white space longer than Skip Distance with the rapid move during engraving.
- Angle – Raster scanline angle relative to machine X direction.
- Cross-hatch – Two perpendicular passes for improved engraving quality.
CNC Router Mode
If your machine is configured as a CNC Router (see Settings > Machines), the interface will switch to router-specific parameters:
- Tool Diameter – Used for automatic contour offset.
- Spindle RPM – Spindle speed command (M3 S...).
- Feed XY & Plunge Z – Separate feed rates for horizontal move and vertical entry.
- Z Origin – Choose whether Z=0 is at the Top of the material or on the Spoilboard.
- Pass Depth – Maximum depth of a single cutting pass. Multiple passes are generated automatically to reach the full material thickness.
- Milling Direction – Choose between Climb or Conventional milling.
- Safe Z & Retract Z – Safe heights for rapid movements and transitions between cuts.
Generating and Downloading
- Click the Play button (play_arrow) to start the G-code generation.
- Once finished, a list of G-code files (one for each material sheet) will appear in the sidebar and you will see preview of the machine motion on the right side.
- You can Download individual files or proceed directly to the Execute G-code page to start cutting.
- If the Job Queue is enabled, you can click the Add to Job Queue button to open a modal and send the task to the queue for later processing.
Advanced Generation Options
In addition to processing nested layouts, the Generate page allows you to work with single files or calibration tools directly.
Upload Part
If you don't need to nest multiple parts, you can upload a single DXF, SVG, or Bitmap file directly on the Generate page or via Create menu () icon. After uploading, you can set the exact dimensions (Width/Height) of the part before generating its G-code. This is the fastest way to process a single item.
Engrave Vector
You can upload a DXF, SVG or bitmap file and engrave its contours instead of cutting them. For bitmaps, the contours will be traced and engraved as vector lines.
Auto Engrave
This powerful feature allows you to automatically detect objects in a bed photo and engrave designs onto them without manual layout preparation. It is ideal for batch processing items like coasters, keychains, or phone cases.
- Object Detection – Load a bed photo and select one object. Dekupeo will find all similar objects on the bed based on color threshold.
- Design Attachment – Choose between Raster (images), Vector (SVG/DXF), or Text designs.
- Text Engrave – You can add Default text to all objects or use Variable text for individualization (e.g., serial numbers or names). Variable data can be manually entered or imported from a CSV file.
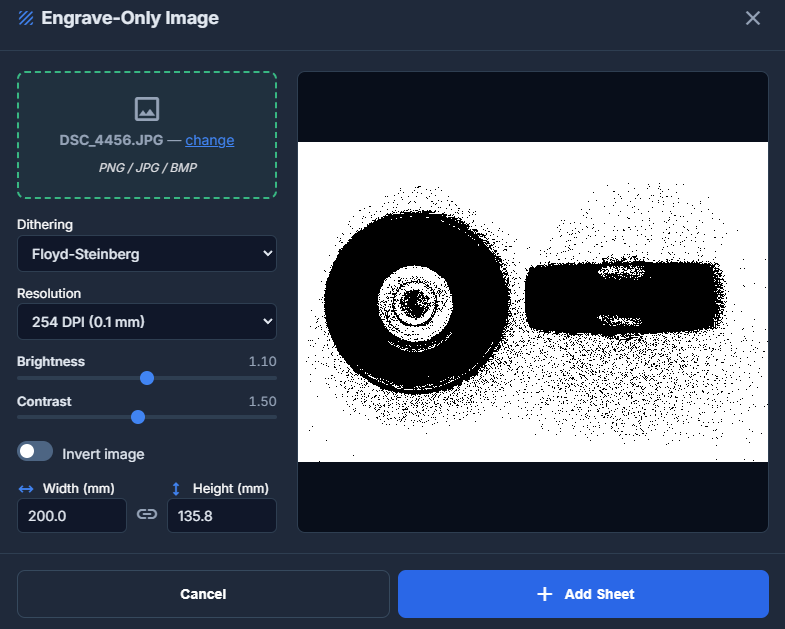
Engrave Raster
This feature is designed for raster-only engraving. You can upload an image (PNG, JPG, BMP) and convert it into a dithered G-code toolpath. You can adjust the following in the Engrave Raster modal:
- Dithering – Choose between Floyd-Steinberg, Bayer, or Threshold.
- Resolution – Select the DPI (e.g., 254 DPI for 0.1 mm line spacing).
- Adjustments – Fine-tune brightness and contrast, or invert the image.
- Scaling – Set the final size of the engraved image on the material.
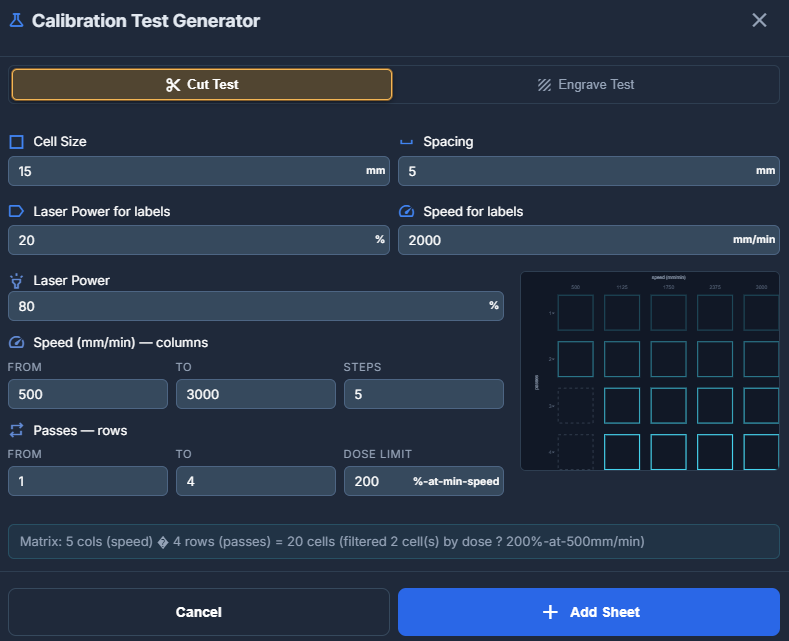
Generate Test (Calibration)
To find the perfect power and speed settings for a new material, use the Calibration Test Generator. It allows you to create a test grid of squares with varying parameters:
- Cut Test – Creates a grid where each row or column uses different Speeds (e.g., 500 to 2000 mm/min) or Passes, at a fixed power. This helps you find the threshold where the laser cleanly cuts through the material.
- Engrave Test – Creates a power/speed matrix. This is essential for seeing how different combinations of speed and power affect the darkness and depth of the engraving on your specific material.
Continue to Run & Burn to learn how to send generated G-code to your laser cutter.